Installation
Requirements
OSP has been verified to work with the following requirements
Ubuntu 20.04 or later, Debian 10 or later
Python 3.8 or later
MySQL 5.7.7 or later, or MariaDB > 10.1, if not using SQLite
SMTP Mail Server for Email Address Validation and Subscriptions
FFMPEG 4 or greater
Dual Core Processor at 2.4 Ghz
4 GB RAM
120 GB HDD Storage
Upstream Bandwidth > 35Mbps for 720p/30fps Streams to 10 people @ 3500kbps bit rate
Install Open Streaming Platform
Script Install - Single Server (OSP-Core, OSP-RTMP, Ejabberd, Redis, MySQL)
Clone the git repository
git clone https://gitlab.com/Deamos/flask-nginx-rtmp-manager.git
Install the Config Tool Prerequisites (if not already installed)
sudo apt-get install dialog
Run the OSP Configuration Tool
cd flask-nginx-rtmp-manager
sudo bash osp-config.sh
Select Option 1 - “Install…”
Select Option 1 - “Install OSP - Single Server”
NOTE: If you have existing installations of MariaDB and Nginx, they will be replaced/modified by this installation. You will also be shown this warning with a Yes/No choice, as one final confirmation before proceeding. So back up any config files or other important files related to MariaDB and Nginx beforehand.
During the install process, the Config Tool will ask for an Ejabberd Full Qualified Domain Name (FQDN). This should be the same as the public domain name which will be used to access OSP. This should be a valid DNS entry as it is used to configure Ejabberd’s Chat Domain and by default is used by the chat client to connect users to the XMPP chat system. IP addresses may not function properly.
On completion, exit the OSP Config Tool.
Review the values in the OSP
/opt/osp/conf/config.py.
NOTE:
secretKeyandpasswordSaltshould be changed from their default values.
sudo nano /opt/osp/conf/config.py
Restart the OSP Core Workers
sudo systemctl restart osp.target
To test streaming on the server, see the “Testing OSP server” section of the Streaming page.
Script Install - Split Server Install - OSP Components on Different Servers
Starting with OSP version 0.8.0, OSP components can be split over multiple servers. This helps with spreading the load required for a busy OSP install with many viewers. In addition, splitting the components can be useful to set up load balancing by having multiple copies of the component and using a load balancer, such as HAproxy. To perform a Split Server Setup, please review the following requirements:
Componentaization - Multiple components can be installed on a single server to reduce cost. Doing so can also prevent needing some of the considerations in this list. For Example, if you consolidate OSP-Core and OSP-RTMP and do not require OSP-Edge Servers, you will not need Centralized storage as they
Centralized Storage - OSP requires some form of mounted centralized storage for Videos, Clips, & Stream/Video Thumbnails. This can be accomplished easily by using an S3-based storage bucket and using s3fs to mount the bucket to the servers file systems. Another method would be a NFS mount in the require location. Below is the required drive mounts and locations
Mounts
/var/www/videos- OSP-Core, OSP-RTMP/var/www/stream-thumb- OSP-Core, OSP-RTMP/var/www/images- OSP-Core
SSL/TLS - If OSP Core systems use HTTPS with SSL/TLS certificates, certificates will also be needed for the Ejabberd, Edge, Proxy, or OSP-RTMP (Only if using Proxy) Servers to prevent issues with HTTP(s) mixed content.
MySQL & Redis - the OSP Config Tool does not have an option for MySQL and Redis installs. It is recommended to be familar with their install and configuration prior to a Split Server Install In some instances, some services can be co-located on the same server. See rules below:
OSP-Core, OSP-RTMP, Redis, ejabberd, and Database can exist on the same server
OSP-Edge can not exist on the same server as OSP-RTMP
OSP-Proxy can not exist on the same server as OSP-Edge, OSP-Core, OSP-RTMP, or ejabberd
Recommended Install Order
Below is the recommended order of setting up split servers. This is due to some of the dependancies requires for some servers to function properly.
Centralized Storage - Have a server ready to connect to
Ejabberd
Redis
Database
OSP-Core
OSP-RTMP
OSP-Edge
OSP-Proxy
Centralized Storage Mounting (Use with OSP-Core and OSP-RTMP)
These instructions are intended to be used after the OSP-Core and OSP-RTMP install processes. After installing the OSP components, it is recommended to determine and establish a central storage server setup on completion of component deployment. Due to the many possible configurations of using central, shared storage, it is impossible to cover a “best” method for doing so. For the purposes of this documentation, it is assumed that an S3-compatable bucket will be used and mounting is covered below using s3fs. DO NOT USE s3fs 1.86-1. A critical bug in caching can lead to mount failure of the s3 bucket, leading to loss of recordings. Currently the latest Ubuntu LTS (20.04) only has this version of s3fs available.
Install s3fs
sudo apt-get update && sudo apt-get install s3fs
Create a password file. This will contain the S3 key and secret token:
echo S3KEY:S3TOKEN > ~/.passwd-s3fs
Set the permissions to secure the file
chmod 600 ~/.passwd-s3fs
Edit the Fuse Configurations to allow access by non-root users to files
sudo nano /etc/fuse.conf
Comment out the following line
user_allow_otherIdentify and write down the uid and gid of the www-data user. Example:
uid=33(www-data) gid=33(www-data) groups=33(www-data)
sudo -u www-data id
Create the required stub locations:
sudo mkdir -p /var/www/videos
sudo mkdir -p /var/www/images
sudo mkdir -p /var/www/stream-thumb
Mount the directories to the S3-compatible bucket using your S3 Credentials and the identified UID & GID frm Step 6
s3fs <space_name> /var/www/videos -o url=<s3 endpoint> -o use_cache=/tmp -o allow_other -o use_path_request_style -o uid=<UID> -o gid=<GID>
s3fs <space_name> /var/www/images -o url=<s3 endpoint> -o use_cache=/tmp -o allow_other -o use_path_request_style -o uid=<UID> -o gid=<GID>
s3fs <space_name> /var/www/stream-thumb -o url=<s3 endpoint> -o use_cache=/tmp -o allow_other -o use_path_request_style -o uid=<UID> -o gid=<GID>
Verify the Mount was successful. The buckets should show as a s3fs mount at the bottom of the output
mount
Note: To mount persistently, you can add the following to your fstab file
s3fs#<bucket_name> /var/www/images fuse url=<endpoint_url>,use_cache=/tmp,allow_other,use_path_request_style,_netdev,uid=33,gid=33 0 0
Ejabberd
Clone the git repository
git clone https://gitlab.com/Deamos/flask-nginx-rtmp-manager.git
Install the Config Tool Prerequisites (if not already installed)
sudo apt-get install dialog
Run the OSP Configuration Tool
cd flask-nginx-rtmp-manager
sudo bash osp-config.sh
Select Option 1 - “Install…”
Select Option 6 - “Install Ejabberd”
During the install process, the Config Tool will ask for an Ejabberd Full Qualified Domain Name (FQDN). This should be the same as the public domain name which will be used to access OSP. This should be a valid DNS entry. Use of an IP address may not function properly.
On completion, exit the OSP Config Tool.
Setup a new Ejabberd admin account.
sudo /usr/local/ejabberd/bin/ejabberdctl register admin localhost <password>
Edit the
ejabberd.yml
sudo nano /usr/local/ejabberd/conf/ejabberd.yml
Change the following lines to match your expected configuration:
Line 43-44
port: 5443
ip: "::"
Line 55-56
port: 5280
ip: "::"
Line 77-78
port: 4560
ip: "::"
Line 91-93 (Add one line per OSP core or use CIDR Notation to allow a block of IPs)
ip:
- 127.0.0.0/8
- ::1/128
- <ip address of OSP Core>
Save the
ejabberd.ymlfileEdit the
auth_osp.pyAuthentication Handler
sudo nano /usr/local/ejabberd/conf/auth_osp.py
Edit the protocol and ospAPIServer variables to match your OSP Core Instance.
protocol = "https"
ospAPIServer = "osp.example.com"
Save the
auth_osp.pyfileRestart Ejabberd
sudo systemctl restart ejabberd
Redis
Install Redis
sudo apt update
sudo apt install redis-server
Edit the
redis.conffile
sudo nano /etc/redis/redis.conf
Find & Edit the bind location to listen on all interfaces
bind 0.0.0.0
Find and Set a Redis Password
requirepass <Password>
Save the
redis.conffileRestart Redis
sudo systemctl restart redis.service
Database
Install MariaDB
sudo apt-get update && sudo apt-get install mariadb-server
Download the OSP Modifications for MariaDB
sudo wget "https://gitlab.com/Deamos/flask-nginx-rtmp-manager/-/raw/master/setup/mysql/mysqld.cnf" -O /etc/mysql/my.cnf
Edit the my.cnf file
sudo nano /etc/mysql/my.cnf
Edit the bind-bind address to listen on all interfaces
bind-address = 0.0.0.0
Restart MariaDB
sudo systemctl restart mysql
Log into MariaDB
sudo mysql
Create the Database & User. Be aware the remote server ips should be the IP address(es) of the OSP-Core Systems (See https://mariadb.com/kb/en/configuring-mariadb-for-remote-client-access/#granting-user-connections-from-remote-hosts)
CREATE DATABASE osp;
CREATE USER '<username>'@'<remote_server_ip>' IDENTIFIED BY '<password>';
GRANT ALL PRIVILEGES ON osp.* TO '<username>'@'<remote_server_ip>';
Quit the MariaDB Console
quit;
The Database will be initialized on the successful run of an OSP-Core Instance
OSP-Core
Clone the git repository
git clone https://gitlab.com/Deamos/flask-nginx-rtmp-manager.git
Install the Config Tool Prerequisites (if not already installed)
sudo apt-get install dialog
Run the OSP Configuration Tool
cd flask-nginx-rtmp-manager
sudo bash osp-config.sh
Select Option 1 - “Install…”
Select Option 2 - “Install OSP-Core”
On completion, exit the OSP Config Tool.
Copy the OSP
config.py.distfile toconfig.py
sudo cp /opt/osp/conf/config.py.dist /opt/osp/conf/config.py
Edit the
config.pyfile
sudo nano /opt/osp/conf/config.py
Change the dbLocation variable to match your database credentials and IP/DNS
dbLocation = 'mysql+pymysql://<user>:<password>@<db_host>/<db_name>?charset=utf8mb4'
Change the Redis variables to match the IP/DNS and password set for it
redisHost="redis.example.com"
redisPort=6379
redisPassword="redis_password"
Change the Ejabberd variables to match your configuration
ejabberdAdmin = "admin" <--Leave this as admin
ejabberdPass = "ejabberd_admin_password"
ejabberdHost = "localhost" <--Leave this as localhost
ejabberdServer ="ejabberd.example.com"
Review the values in the OSP
/opt/osp/conf/config.py.
NOTE: secretKey and passwordSalt should be changed from their default values.
sudo nano /opt/osp/conf/config.py
Restart the OSP Core Workers
sudo systemctl restart osp.target
Save the
config.pyfileInitialize the Database by running the command line upgrader
sudo bash osp-config.sh upgrade db
Open a web browser and browse to:
http://<OSPCore IP Address or DNS>Setup OSP using the Initial Configuration Wizard
OSP-RTMP
Clone the git repository
git clone https://gitlab.com/Deamos/flask-nginx-rtmp-manager.git
Install the Config Tool Prerequisites (if not already installed)
sudo apt-get install dialog
Run the OSP Configuration Tool
cd flask-nginx-rtmp-manager
sudo bash osp-config.sh
Select Option 1 - “Install…”
Select Option 3 - “Install OSP-RTMP”
On completion, exit the OSP Config Tool.
Copy and Edit the OSP-RTMP
config.pyfile
sudo cp /opt/osp-rtmp/conf/config.py.dist /opt/osp-rtmp/conf/config.py
sudo nano /opt/osp-rtmp/conf/config.py
Change the ospCoreAPI Variable to point at your OSP-Core instance
ospCoreAPI = "http://ospcore.example.com"
Start the OSP-RTMP Instance
sudo systemctl start osp-rtmp
Open a web browser and go to your OSP-Core Instance
http://ospcore.example.com
Log on as an Admin and Open the Admin Settings
Select RTMP Servers
Click the Plus Sign Button
Type in the IP or Fully Qualified Domain Name for your OSP-RTMP Server and click Add
OSP-Edge
Clone the git repository
git clone https://gitlab.com/Deamos/flask-nginx-rtmp-manager.git
Install the Config Tool Prerequisites (if not already installed)
sudo apt-get install dialog
Run the OSP Configuration Tool
cd flask-nginx-rtmp-manager
sudo bash osp-config.sh
Select Option 1 - “Install…”
Select Option 4 - “Install OSP-Edge”
When prompted, input the IP address of your OSP-RTMP Instance
On completion, exit the OSP Config Tool.
If you need to add additional authorized OSP-RTMP Instances, edit the
osp-edge-rtmp.conffile for Nginx
sudo nano /usr/local/nginx/conf/services/osp-edge-rtmp.conf
Add any additional authorize publishing IPs to stream-data and stream-data-adapt:
allow publish <IP Address>;
Restart Nginx
sudo systemctl restart nginx-osp
Open a web browser and go to your OSP-Core Instance
http://ospcore.example.com
Log on as an Admin and Open the Admin Settings
Select Edge Streamers
Add the Fully Qualified Domain Name or IP Address of the Edge Server
Add the Load Percentage that the Edge Server will use.
NOTE: The sum of all Edge Servers must equal 100%.
Restart Nginx on all OSP-Core Servers
sudo systemctl restart nginx-osp
OSP-Proxy
Clone the git repository
git clone https://gitlab.com/Deamos/flask-nginx-rtmp-manager.git
Install the Config Tool Prerequisites (if not already installed)
sudo apt-get install dialog
Run the OSP Configuration Tool
cd flask-nginx-rtmp-manager
sudo bash osp-config.sh
Select Option 1 - “Install…”
Select Option 5 - “Install OSP-Proxy”
When prompted, input the Protocol and Fully Qualified Domain Name of your OSP-Core Instance (ex: https://osp.example.com)
On completion, exit the OSP Config Tool.
If you are using TLS/SSL on your Core Site, Acquire a TLS Certificate
Edit
/usr/local/nginx/conf/custom/osp-proxy-custom-servers.conf
sudo nano /usr/local/nginx/conf/custom/osp-proxy-custom-servers.conf
Change Line 8 to match your OSP Core FQDN
valid_referers server_names osp.example.com ~.;
If you are using TLS, Comment the following Line:
listen 80 default_server;Uncomment the following lines and add the TLS configuration:
# listen 443 ssl http2 default_server;
# ssl_certificate /etc/letsencrypt/live/osp.example.com/fullchain.pem;
# ssl_certificate_key /etc/letsencrypt/live/osp.example.com/privkey.pem;
# ssl_protocols TLSv1.2 TLSv1.3;
Edit the OSP-Proxy Configuration File
sudo nano /opt/osp-proxy/conf/config.py
Change the Flask Secret Key to a Random Value
# Flask Secret Key
secretKey="CHANGEME"
If you are dedicating the proxy to a specific source (An Edge or Another Proxy), uncomment the ForceDestination Lines and set to match your source
# Force Destination - Use to point to Specified Edge Server or Tiered Proxy. Uncomment to override API's RTMP List and use the destination you list
forceDestination = "edge.example.com"
forceDestinationType = "edge" # Choices are "edge", "proxy"
Restart Nginx-OSP and OSP-Proxy
sudo systemctl restart nginx-osp
sudo systemctl restart osp-proxy
Ensure all Edge or RTMP Servers are listed in the OSP-Core Admin Panel. OSP-Proxy will query the OSP API and generate configurations to handle the proxy connection to retrieve the HLS fragments.
Perform a first run of the Configuration File Generator
cd /opt/osp
sudo bash updateUpstream.sh
Connect to each OSP-RTMP/Single Server and perform the following on each:
If using TLS on the Core, Generate a TLS certificate
Edit the
/usr/local/nginx/conf/custom/osp-rtmp-custom-authorizeproxy.conf
sudo nano /usr/local/nginx/conf/custom/osp-rtmp-custom-authorizeproxy.conf
Add the IP Address of each OSP-Proxy that will be accessing the source for /stream-thumb, /live-adapt, and /live:
# allow <ip of proxy>;
allow 201.13.12.50;
allow 193.10.3.9;
If using TLS, Edit the
/usr/local/nginx/conf/custom/osp-rtmp-custom-server
sudo nano /usr/local/nginx/conf/custom/osp-rtmp-custom-server
Comment out the first line, uncomment the TLS information and add your certificate info (Note: Port 5999 will stay the same):
#listen 5999 default_server;
### Comment Above and Uncomment/Edit Below for OSP-Proxy TLS ###
listen 5999 ssl http2 default_server;
ssl_certificate /etc/letsencrypt/live/osp.example.com/fullchain.pem;
ssl_certificate_key /etc/letsencrypt/live/osp.example.com/privkey.pem;
ssl_protocols TLSv1.2 TLSv1.3;
Restart the Nginx-OSP instance
sudo systemctl restart nginx-osp
If you forced an Edge Server on Step 14, Connect to the Edge Server and edit
/usr/local/nginx/conf/locations/osp-edge-redirects.conf
sudo nano /usr/local/nginx/conf/custom/osp-edge-redirects.conf
Comment the add_headers line for /edge and /edge-adapt
#add_header 'Access-Control-Allow-Origin' "*" always;
Edit the custom referes file at
/usr/local/nginx/conf/custom/osp-edge-custom-refer.conf
sudo nano /usr/local/nginx/conf/custom/osp-edge-custom-refer.conf
Add the OSP Core Server to the Valid Referers list for /edge and /edge-adapt
valid_referers server_names osp.example.com ~.;
Restart Nginx-OSP
sudo systemctl restart nginx-osp
Add the OSP-Proxy Domain to the OSP-Core’s Admin Panel under Settings
Test a Stream and verify that the video is displaying
Manual Install
Coming Soon
Docker Install
A Dockerfile has been provided for running OSP in a container. However due to the way NginX, Gunicorn, Flask, and Docker work, for OSP to work properly, the Frontend must be exposed using Port 80 or 443 and the RTSP port from OBS or other streaming software must be exposed on Port 1935. This accomplished easily by using a reverse proxy in Docker such as Traefik. However, Port 1935 will not be proxied and must be mapped to the same port on the host. An external Redis server/container is required to handling asynchronous communications between the internal Gunicorn worker instances.
Docker-Compose
The recommended method for OSP Deployment in Docker is to use the provided docker-compose.yml file which can be found here: https://gitlab.com/osp-group/open-streaming-platform-docker/-/blob/master/docker-compose.yml
If you prefer pre-built containers you don’t have to clone the whole repository to set up all needed containers, just edit docker-compose.yml and change the build lines to the already provided image ones by removing/adding # in front of those accordingly. Before running docker-compose up make sure you edit all environment variables accordingly as it is a requirement to set those beforehand! There are multiple similar ones for each container which all need to be set to the exact same value for the setup process to run through smoothly, simply search/replace those for a faster workflow.
Docker Hub URLs
OSP-Core: https://hub.docker.com/r/deamos/osp-coreOSP-RTMP: https://hub.docker.com/r/deamos/osp-rtmpOSP-Ejabberd: https://hub.docker.com/r/deamos/osp-ejabberd
Environment Variables
Remember to set the required variables according to the comments inside the docker-compose.yml file before running docker-compose up! Else you may misconfigure those containers and need to start from scratch!
OSP-Core
OSP_SERVER_ADDRESSFQDN of the OSP DomainOSP_REDIS_HOSTDomain/IP of Redis ServerOSP_REDIS_PORTRedis Server PortOSP_REDIS_PASSWORDRedis Password, if usedOSP_CORE_DBDatabase Connection stringex:
mysql+pymysql://\<DB User\>:\<DB Password>@\<DB Server>/osp
OSP_CORE_SECRETKEYFlask Secret Key (Should be Random Value)OSP_CORE_PASSWORD_SALTUser DB Salt Value (Should be Random Value)OSP_CORE_ALLOWREGISTRATIONAllow Users to Register (Bool)OSP_CORE_REQUIREEMAILREGISTRATIONRequire Email Validation (Bool)OSP_EJABBERD_PASSWORDEJabberd Admin PasswordOSP_EJABBERD_RPCHOSTEjabberd XML-RPC FQDN/IP (OSP-Core -> Ejabberd)OSP_EJABBERD_BOSHDOMAINEjabberd BOSH-HTTP FQDN/IP (Users -> Ejabberd)OSP_SMTP_SENDASSMTP Emails Send As Email Addressex: noreply@email.com
OSP_SMTP_SERVERADDRESSSMTP Server AddressOSP_SMTP_SERVERPORTSMTP Server PortOSP_SMTP_ENCRYPTIONSMTP Encryption Type [none | ssl | tls]OSP_SMTP_USERNAMESMTP Authentication UsernameOSP_SMTP_PASSWORDSMTP Authentication PasswordOSP_RTMP_SERVERInitial OSP-RTMP Server FQDNAdds an RTMP Server to the OSP Configuration
OSP_CORE_TYPESets the type of OSP-Core Deployment [core | celery | beat]If not defined, defaults to core
OSP-RTMP
OSP_API_HOSTProtocol and Domain for OSP APIex: http://osp.example.com
OSP_RTMP_SECRETKEYFlask Secret Key (Should be Random Value)
OSP-Ejabberd
EJABBERD_XMLRPC_ALLOWIPXML-RPC Allowed IP AddressesEJABBERD_PASSWORDEjabberd Admin PasswordEJABBERD_DOMAINOSP Instance Wide Domain. This should be the same as your OSP Instance Public FQDNOSP_API_PROTOCOLProtocol for accessing the OSP API [http | https]OSP_API_DOMAINPublic FQDN for Accessing the OSP API. This should be the same as your OSP Public FQDN
Recommended Volumes/Mount Points
/var/www- Storage of Images, Streams, and Stored Video Files/usr/local/nginx/conf- Contains the NginX Configuration files which can be altered to suit your needs (HTTPS without something like Traefik)
Database Setup
Installation
Set Up MySQL
Prior to using MySQL with OSP the first time, do the following to configure OSP for full Unicode Support (UTF8MB4)
Install MySQL Server on Database Server or OSP Server
sudo apt-get install mysql-server
Copy the MySQL Configuration File in to MySQL
sudo cp /opt/osp/setup/mysql/mysqld.cnf /etc/mysql/my.cnf
Restart MySQL
sudo systemctl restart mysql
Open MySQL and create the OSP Database and User
sudo mysql
CREATE DATABASE osp;
CREATE USER 'newuser'@'localhost' IDENTIFIED BY 'password';
GRANT ALL PRIVILEGES ON osp.* TO 'newuser'@'localhost';
Edit the OSP Configuration File to use MySQL
sudo vi /opt/osp/conf/config.py
From:
dbLocation="sqlite:///db/database.db"
To:
dbLocation = 'mysql+pymysql://username:password@localhost/osp?charset=utf8mb4'
Restart OSP
sudo systemctl restart osp.target
Note: For Servers that have upgraded from versions prior to Beta 6, see Installation > Tweaks > Database on the sidebar to convert from UTF8 to UTF8MB4 for Full Unicode Support
Backup and Restore
Backup
System backups can be performed via making a backup copy of the /opt/osp/conf/config.py file and taking a SQL dump of the database using a tool like mysqldump
sudo mysqldump --databases osp > dump.sql
Restore
Copy the backup
config.pyfile to/opt/osp/confRestore the SQL backup taken
mysql < dump.sql
Migration
Moving from UTF8 to UTF8MB4 in MySQL
Installs prior to Beta 6 were not configured to fully use UTF8MB4 and may not be able to use the full Unicode set. To correct this issue, do the following:
Backup your existing Database per the proceedures above.
Shut down OSP
sudo systemctl stop osp.target
Open the MySQL Console
sudo mysql
Drop the OSP Database;
drop database osp;
Exit the MySQL Console
quit;
Follow the steps for Setting up a New MySQL install, starting at Step 2
On the Insital Setup Wizard, Restore your Database Per the Steps under Restore Above.
Chat (XMPP)
Beginning with OSP v0.7.0, Chat has been moved to an XMPP based system using ejabberd. Channel chatrooms now maintain a temporary history and can be accessed by Guests, if configured.
Installation
Single Server
By default, OSP will automatically install and configure XMPP components for use during install or upgrade to versions 0.7.0 or above. During the upgrade process, you will be prompted to enter the OSP Site Address. This address must match the OSP Site Address (Typically the OSP Fully Qualified Domain Name (FQDN) or IP Address of OSP) Failure to enter the correct address will cause the Chat system to not function properly.
If you must change your OSP Site Address, this change must also be made to the ejabberd.yml configuration file and ejabberd restarted.
You can find the ejabberd.yml file in /usr/local/ejabberd/conf/ejabberd.yml and edit the following lines:
Line 17-19
hosts:
- localhost
- CHANGEME <---Your OSP Site Address
Line 167-173
host_config:
"CHANGEME": <---Your OSP Site Address
auth_method:
- external
- anonymous
allow_multiple_connections: true
anonymous_protocol: login_anon
sudo systemctl restart ejabberd
OSP will also automatically set the ownership for each created OSP Channel and set the Channel Owner to Admin/Owner for the XMPP channel on start of the OSP service. If you have an issue with ownership, it is recommended to restart OSP to perform an XMPP Rebuild.
External Server
Supported on versions >= 0.7.9 {.is-info} Ejabberd can be configured to run an an external service. However, some manual changes must be made to allow it to operate with OSP properly. To setup an external ejabberd server, do the following:
Install ejabberd on a separate server
sudo wget -O "/tmp/ejabberd-20.04-linux-x64.run" "https://www.process-one.net/downloads/downloads-action.php?file=/20.04/ejabberd-20.04-linux-x64.run"
chmod +x /tmp/ejabberd-20.04-linux-x64.run
/tmp/ejabberd-20.04-linux-x64.run ----unattendedmodeui none --mode unattended --prefix /usr/local/ejabberd --cluster 0
Create the conf directory and copy the ejabberd configuration yml, inetrc, and
auth_osp.pyfrom the OSP Repo to the directory
sudo mkdir /usr/local/ejabberd/conf
wget -O "/usr/local/ejabberd/conf/ejabberd.yml" "https://gitlab.com/osp-group/flask-nginx-rtmp-manager/-/raw/master/installs/ejabberd/setup/ejabberd.yml"
wget -O "/usr/local/ejabberd/conf/inetrc" "https://gitlab.com/osp-group/flask-nginx-rtmp-manager/-/raw/master/installs/ejabberd/setup/inetrc"
wget -O "/usr/local/ejabberd/conf/auth_osp.py" "https://gitlab.com/osp-group/flask-nginx-rtmp-manager/-/raw/master/installs/ejabberd/setup/auth_osp.py"
Edit the
/usr/local/ejabberd/conf/ejabberd.ymlfile and update the fields based on your configuration Line 17-19: SetCHANGEMEto your OSP’s FQDN
hosts:
- localhost
- OSP.example.com
Line 43-53: Change ip to “::”
port: 5443
ip: "::"
module: ejabberd_http
tls: true
request_handlers:
/admin: ejabberd_web_admin
/api: mod_http_api
/bosh: mod_bosh
/captcha: ejabberd_captcha
/upload: mod_http_upload
/ws: ejabberd_http_ws
Line 55-65: Change ip to “::”
port: 5280
ip: "::"
module: ejabberd_http
request_handlers:
/admin: ejabberd_web_admin
/api: mod_http_api
/bosh: mod_bosh
/captcha: ejabberd_captcha
/upload: mod_http_upload
/ws: ejabberd_http_ws
/.well-known/acme-challenge: ejabberd_acme
Line 77-83: Change ip to “::”
port: 4560
ip: "::"
module: ejabberd_xmlrpc
access_commands:
admin:
commands: all
options: []
Line 87-96: Add the IP Address to your OSP Instances in the ip block
acl:
local:
user_regexp: ""
loopback:
ip:
- 127.0.0.0/8
- ::1/128
- YOUR OSP IP HERE
admin:
user:
- "admin@localhost"
Line 164: Change the location of the auth_osp.py file to match below
extauth_program: "/usr/bin/python3 /usr/local/ejabberd/conf/auth_osp.py"
Line 167-173: Set CHANGEME to your OSP’s FQDN
host_config:
"OSP.example.com":
auth_method:
- external
- anonymous
allow_multiple_connections: true
anonymous_protocol: login_anon
Install Python Requirements
sudo apt-get install python3-pip
sudo pip3 install requests
Edit the
/usr/local/ejabberd/conf/auth_osp.pyfile Line 4-5: Change the protocol and ospAPIServer values to match your OSP Instance
protocol = "http"
ospAPIServer = "OSP.example.com"
Copy the ejabberd SystemD file
sudo cp /usr/local/ejabberd/bin/ejabberd.service /etc/systemd/system/ejabberd.service
sudo systemctl daemon-reload
sudo systemctl enable ejabberd
sudo systemctl start ejabberd
Configure the local admin account with a password. Do not change the localadmin part
sudo /usr/local/ejabberd/bin/ejabberdctl register admin localhost YOURADMINPASSWORD
Install Nginx to reverse proxy the XMPP Bosh Port
sudo apt-get install nginx
Edit the default Nginx site file for the reverse proxy and add the following in the server directive block
sudo vi /etc/nginx/sites-available/default
location /http-bind/ { # BOSH XMPP-HTTP
proxy_pass http://localhost:5280/bosh;
proxy_set_header Host $host;
proxy_set_header X-Forwarded-For $remote_addr;
proxy_redirect off;
proxy_buffering off;
proxy_read_timeout 65s;
proxy_send_timeout 65s;
keepalive_timeout 65s;
tcp_nodelay on;
}
Restart the Nginx Service
sudo systemctl restart nginx
On the OSP Server, update the ejabberd admin password and add the ejabberdServer variable to the
/opt/osp/conf/config.pyfile
sudo vi /opt/osp/conf/config.py
# EJabberD Configuration
ejabberdAdmin = "admin"
ejabberdPass = "YOURADMINPASSWORD"
ejabberdHost = "localhost"
ejabberdServer = "ejabberd.example.com"
Restart the OSP Server
sudo systemctl restart osp.target
Network Configuration
OSP’s XMPP configuration requires the following open ports for chat to function:
TCP/5222: Used for ejabberd Client to Server connections
TCP/5269: Used for ejabberd Server to Server connections
TCP/5443: External Server Jabber HTTPS-BOSH connection External Server Only
TCP/5280: External Server Jabber HTTP-BOSH connection External Server Only
TCP/4560: External Server XML-RPC Server Control External Server Only
OSP Configuration
XMPP Channels are configured on a channel by channel basis. You can find the settings under My Channels -> Chat
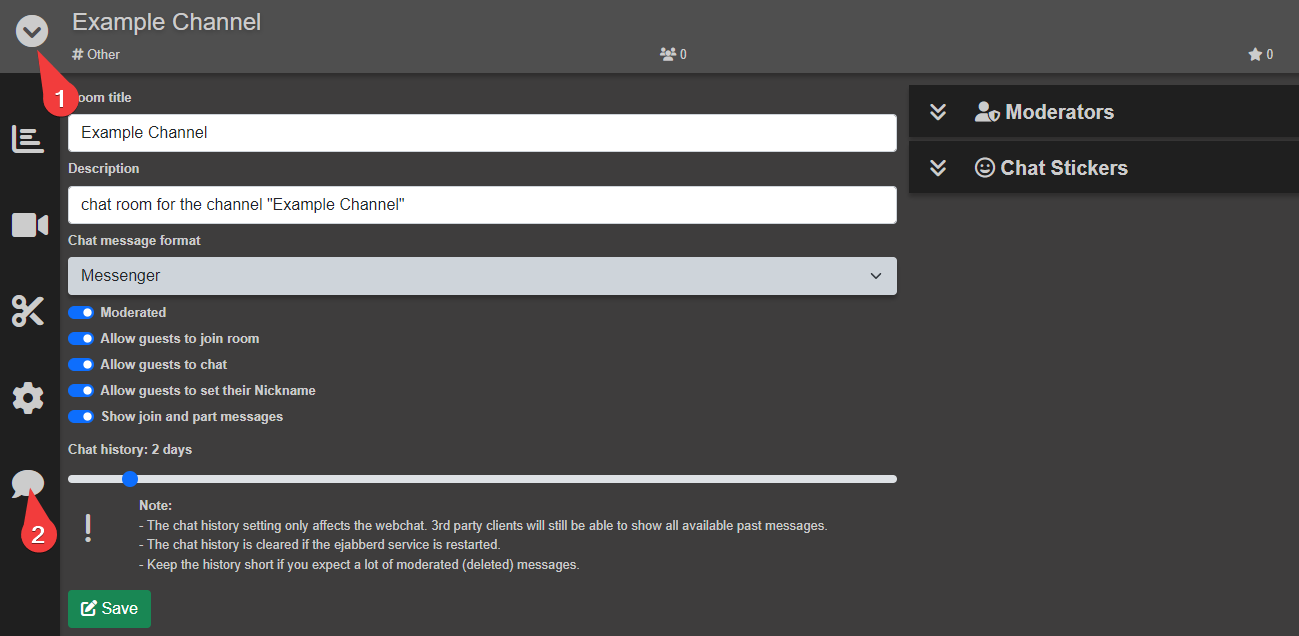 Channel configuration allows you to define who is allowed to chat, how chat is managed, and who can manage it.
Room Title: Name of Room, displayed to XMPP Chat Clients
Description: Room description, displayed to XMPP Chat Clients
Chat message format: Changes the appearance of chat messages.
Messenger: Separates every message into it’s own “bubble”.
IRC: A more Twitch-Like experience.

Moderated: Only Users Identified as Participants may Chat
Allow guests to join room: Allow Unauthenticated Guest Users to Join the Chat
Allow guests to chat: Automatically set Unauthenticated Guest Users as Participants.
Allow guests to set their Nickname: Allows and asks Unauthenticated Guest Users to set a Nickname.
Show join and part messages: Shows in chat when Users connect and disconnect from the Chat.
Chat history: How long chat messages should be displayed in the Web Chat. (Does not affect 3rd Party Clients! Restart ejabberd to clear history!)
Moderators: Add and Remove Chat Moderators from this Channel.
Chat Stickers: Upload and Manage stickers (essentially custom emojis) for this channel. The OSP Instance Admin can also define Global Stickers which will show up on all channels.
Usage
The Chat Window is a basic display of conversations and moderation controls for users and admins. You can view who is in a channel, view their profile, or control basic functions such as ban lists or channel roles.
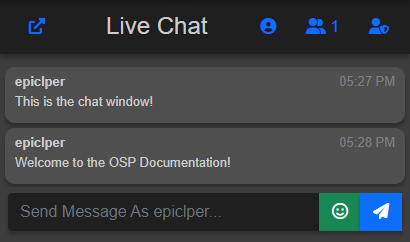
All users are set as one the following roles:
Moderator: Able to control the room and has access to all moderator controls
Participant: Able to Chat in the room (ie: has voice)
Guest: Able to view Chat in the room, but can not chat. Any role changes made by a moderator are set as permanent and will remain on joining / leaving a room.
User Options
By clicking on a username in chat or in the User List, users and moderators are displayed options targeting that user.

User Controls
Profile: Opens a Popup that displays the User’s Bio and any Channels, Streams, Videos, or Clips they may own.
Mute: Hides all chat from a user for your account. You will no longer see any messages from the user until you unmute them.
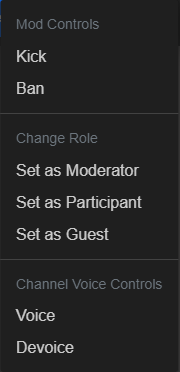
Mod Controls
Kick: Removes the user from the chatroom.
Ban: Removes the user from the chatroom and flags their username as banned.
Change Role / Set as Moderator: Sets the User to have Moderator Controls
Change Role / Set as Participant: Sets the User to be a Participant (Able to Chat if Channel is set to Moderated)
Change Role / Set as Guest: Sets the User to be a Guest (Can’t Chat if Channel is set to Moderated)
Channel Voice Controls / Voice: Temporarily grants Participant Status
Channel Voice Controls / Devoice: Temporarily removes Participant Status
Authentication
Each User maintains a XMPP username and password which is required to authenticate to the Chat Server. This is handled by OSP by default, but the login info can also be used to authenticate using an XMPP client. To find you XMPP login info, you can go to your user settings and copy the XMPP username and password at the top.

In addition to user specific XMPP login info, each channel also maintains a XMPP token to be used when a Channel is set to be protected. In these instances, users may use the Channel XMPP Token to join the Chatroom using an external client.

Two Way Integration with Other Chat Clients
(Provided by djetaine on Discord)
Using Matterbridge, you can integrate your OSP Instance with multiple chat clients like Discord, IRC, Twitch, Telegram, etc. Each platform should have its own “Bot” relay account that you will need to create. For additional information and configuration instructions visit the Matterbridge Wiki directly.
Installation - OSP
To facilitate certificate retrieval through the default nginx conf file will need to be modified. If you cannot connect after you finish the installation, look at the ejabberd logs. In some instances you will need to manually create your cert files which can be done using the instructions under “Troubleshooting” Create a backup folder and make a copy of your conf file
mkdir ~/backups
cp /usr/local/nginx/conf/nginx.conf ~/backups/nginx.conf
Open an editor to modify your conf
nano /usr/local/nginx/conf/nginx.conf
Add the following to your nginx conf file below the 443 server block
##Allow for ejabberd acme-challenge
server {
listen 80;
server_name conference.subdomain.domain.tld;
location / {
proxy_pass http://localhost:5280;
}
}
server {
listen 80;
server_name proxy.subdomain.domain.tld;
location / {
proxy_pass http://localhost:5280;
}
}
server {
listen 80;
server_name pubsub.subdomain.domain.tld;
location / {
proxy_pass http://localhost:5280;
}
}
Create DNS Records on your domain registrar for each of the subdomains required by ejabberd. proxy.subdomain, pubsub.subdomain, conference.subdomain Perform an nslookup or ping to very name resolution, restart osp and ejabberd then verify connectivity
sudo systemctl restart osp.target
sudo systemctl restart ejabberd
cat /usr/local/ejabberd/logs/ejabberd.log
If the certificate retrieval was successful, you will see success messages for the certificate. Don’t worry about the local host warnings. If you see warnings for your FQDN, verify that your DNS entries are valid.
 Allow ejabberd traffic through your firewall. If you are hosting from home, be sure to port forward to your OSP host.
sudo ufw allow 5222/tcp
sudo ufw allow 5269/tcp
sudo ufw allow 5280/tcp
You can quickly test the external connectivity with an online xmpp client like conversejs Get your xmpp username and password from your OSP profile settings page at the bottom, then login at https://conversejs.org/fullscreen.html If you can connect, move forward.
Install Matterbridge
Matterbridge will run on many different operating systems and container platforms. In this case we will focus on a digital ocean droplet running ubuntu minimal. See the github page for more information on other installations. Get your instance of ubuntu up and running Create Matterbridge user, download binaries, set permissions and create the directory
sudo adduser --system --no-create-home --group matterbridge
sudo wget https://github.com/42wim/matterbridge/releases/download/v1.22.3/matterbridge-1.22.3-linux-64bit -O /usr/bin/matterbridge
sudo chmod 755 /usr/bin/matterbridge
sudo mkdir /etc/matterbridge
You will now create your configuration file. There are a lot of integrations available but this document will focus on Twitch and Discord. More config help can be found in the Matterbridge Wiki.
For discord, you will need to create a bot and get it’s auth token.
Get your Server ID and Channel ID by turning on developer mode, then right clicking each to copy the ID.
For twitch, you can create a new “bot” user or user your own.
Login to the account you wish to use as a relay
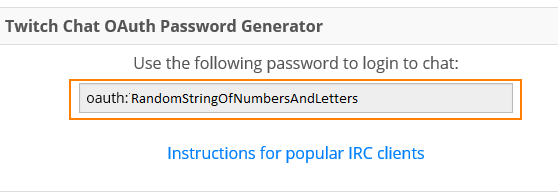
Go to https://twitchapps.com/tmi to get your oauth password. You need the whole thing, including the
oauth:
Open an editor to create the config
sudo nano /etc/matterbridge/matterbridge.toml
You may copy this config file entering your own settings for FQDN, token, server, etc.
[discord.mydiscord]
Token="yourDiscordBotsToken"
Server="YourServerID"
RemoteNickFormat="{PROTOCOL}-**<{NICK}>** "
[irc.twitch]
#Add the oauth token here you got from [https://twitchapps.com/tmi/](https://twitchapps.com/tmi/)
Password="oauth:SomeLettersAndNumbers"
Nick="YourTwitchBotsName"
Server="irc.twitch.tv:6667"
UseTLS=false
RemoteNickFormat="{PROTOCOL}-[{NICK}] "
[xmpp.myxmpp]
Server="fqdn.of.your.OSP.Server:5222"
#Jid your userid
Jid="OSPUserName@yourserver.tld"
Password="PasswordFromUserSettings"
Muc="conference.your.fqdn"
Nick="YourFriendlyUserName"
RemoteNickFormat="{PROTOCOL}-[{NICK}] "
[[gateway]]
name="gateway1"
enable=true
[[gateway.inout]]
account="irc.twitch"
channel="#YourTwitchChannel"
[[gateway.inout]]
account="xmpp.myxmpp"
channel="YourOSPChannelUID"
[[gateway.inout]]
account="discord.mydiscord"
channel="ChannelNameYouWantToSendTo"
Test your configuration by starting matterbridge.
/usr/bin/matterbridge -debug -conf /etc/matterbridge/matterbridge.toml
If all went well, create a service for matterbridge to run as.
sudo nano /etc/systemd/system/matterbridge.service
Paste the following and save the file
[Unit]
Description=matterbridge
After=network.target
[Service]
ExecStart=/usr/bin/matterbridge -conf /etc/matterbridge/matterbridge.toml
User=matterbridge
Group=matterbridge
[Install]
WantedBy=multi-user.target
Enable and run the service
sudo systemctl daemon-reload
sudo systemctl enable matterbridge
sudo systemctl start matterbridge
Set the service to run at startup
sudo systemctl enable matterbridge
You should now have a fully integrated chat with Twitch, OSP and Discord.
Troubleshooting
The two files that will be most important are the ejabberd log and the debug of the matterbridge service. OSP Server
/usr/local/ejabberd/logs/ejabberd.log
Matterbridge Server re-run the matterbridge application with the -debug flag
/usr/bin/matterbridge -debug -conf /etc/matterbridge/matterbridge.toml
Manually configuring certificates if auto creation is not functioning
If the automated acme-challenge isnt working for one reason or another, you can create a cert and assign it manually. Run this command replacing subdomain.domain.tld with your fqdn
sudo certbot certonly --manual -d conference.subdomain.domain.tld -d proxy.subdomain.domain.tld -d pubsub.subdomain.domain.tld -d subdomain.domain.tld --agree-tos --no-bootstrap --manual-public-ip-logging-ok --preferred-challenges dns-01 --server [https://acme-v02.api.letsencrypt.org/directory](https://acme-v02.api.letsencrypt.org/directory)
Create txt records on your dns when asked. You will require a txt record for each subdomain. Combine the full chain you create with the private key
cat etc/letsencrypt/live/yoursite/privkey.pem /etc/letsencrypt/live/yoursite/fullchain.pem > ~/combined.pem
Move your newly created combined pem file to a better location (something like /etc/ssl/ejabberd)
Uncomment the following lines in /usr/local/ejabberd/conf/ejabberd.yml
certfiles:
Add directly beneath
- /etc/ssl/ejabberd/combined.pem
Be SURE to line up your - /etc with the rest of the dashes in the yml file. YAML is very picky about spacing. It must tbe exact.
Let’s Encrypt Setup
The focus of this guide will be to provide an example of how to setup SSL with LetsEncrypt and Certbot. For this example we are using a default install of OSP on Ubuntu 20.04 (or 18.04) LTS
Step one, install Certbot
Install certbot (running with Nginx) as described at https://certbot.eff.org/instructions Installion of certbot in short (for most systems) works with snap as follows:
# sudo snap install core; sudo snap refresh core
# sudo snap install --classic certbot
# sudo ln -s /snap/bin/certbot /usr/bin/certbot
Verify certbot is installed:
# certbot --version
certbot 1.13.0
Create a location for certbot verification outside of the actual webroot
# mkdir /var/certbot
# chmod 755 /var/certbot
Edit the OSP nginx config to use this location for the certbot verification by adding the following lines to /usr/local/nginx/conf/nginx.conf
location /.well-known/acme-challenge {
root /var/certbot;
}
These lines should go under your port 80 server, in my config I put them right below the line “include /usr/local/nginx/conf/locations/*.conf;”
# NGINX to HTTP Reverse Proxies
server {
include /usr/local/nginx/conf/custom/osp-custom-servers.conf;
# set client body size to 16M #
client_max_body_size 16M;
include /usr/local/nginx/conf/locations/*.conf;
location /.well-known/acme-challenge {
 root /var/certbot;
}
# redirect server error pages to the static page /50x.html
error_page 500 502 503 504 /50x.html;
location = /50x.html {
root html;
}
}
include /usr/local/nginx/conf/custom/osp-custom-serversredirect.conf;
Restart nginx.osp to apply modification for certbot to generate cert.
# sudo systemctl restart nginx-osp
Run certbot to request certs from LetsEncrypt
# sudo certbot certonly --webroot -w /var/certbot -d <domain>
This command will prompt you for a few pieces of information and then it will save your certs in /etc/letsencrypt/live/
- Congratulations! Your certificate and chain have been saved at:
/etc/letsencrypt/live/<domain>/fullchain.pem
Your key file has been saved at:
/etc/letsencrypt/live/<domain>/privkey.pem
Your cert will expire on <date>. To obtain a new or tweaked
version of this certificate in the future, simply run certbot
again. To non-interactively renew *all* of your certificates, run
"certbot renew"
Configure nginx-osp to use SSL and the certificates you have requested
Edit /usr/local/nginx/conf/custom/osp-custom-servers.conf and edit the section to similar to below:
Remember to change your domain name and certificate location to match the step above.
#listen 80 default_server;
### Comment Above and Uncomment/Edit Below for OSP-Proxy TLS ###
listen 443 ssl http2 default_server;
ssl_certificate /etc/letsencrypt/live/osp.example.com/fullchain.pem;
ssl_certificate_key /etc/letsencrypt/live/osp.example.com/privkey.pem;
ssl_protocols TLSv1.2 TLSv1.3;
Configure nginx-osp to do http to https redirect
Uncomment all lines in /usr/local/nginx/conf/custom/osp-custom-serversredirect.conf to read as follows:
server {
listen 80;
server_name _;
return 301 https://$host$request_uri;
}
Restart nginx.osp a final time to update your configuration.
# sudo systemctl restart nginx-osp
HAProxy Load Balancing
Pre-requisites
This guide is designed for people running OSP Split server and not single server installations. This guide assumes that you currently have a working setup with at least 1 core server. Tested working on Ubuntu 20.04 (LTS) on 2021.10.11. VPS Spec: 2GB RAM, 1 vCPU and 50GB Disk. Cloud Provider: Digital Ocean. For SSL installation your FQDN must be pointing at your HAProxy Server IP Address. To Install, do the following:
apt-get update
apt-get upgrade
apt install -y haproxy
apt install -y certbot
After installing run haproxy -v to confirm installed and working as intended. You should get an output like: HA-Proxy version 2.0.13-2ubuntu0.3 2021/08/27 - https://haproxy.org/
Setup Config File
Once the install is done you can then configure the Config file
nano /etc/haproxy/haproxy.cfg
Under the defaults section, enter the following lines, replacing words (and the dashes) with your own information.
frontend --name to define frontend http--
# Define Port to Bind To and set the mode
bind :80
bind :::80
mode http
# Used to redirect HTTP Requests to HTTPS
# http-request redirect scheme https unless { ssl_fc }
# Enable this if you want to view stats
# stats uri /haproxy?stats
# Sets the default backend for servers
default_backend --name to define below backend (MUST MATCH)--
# Certbot SSL Installation
acl is_certbot path_beg /.well-known/acme-challenge/
use_backend backend-certbot if is_certbot
#frontend --name to define frontend https--
# bind :443 ssl crt /etc/haproxy/ssl/
# bind :::443 ssl crt /etc/haproxy/ssl/
# mode http
# ACL for detecting Let's Encrypt validtion requests
# acl is_certbot path_beg /.well-known/acme-challenge/
# use_backend backend-certbot if is_certbot
# default_backend --name to define below backend (MUST MATCH)--
backend --name to define below backend (MUST MATCH ABOVE default_backed)--
mode http
balance leastconn
server --yourservername-- --server internal or public ip--:80 check inter 5s rise 3 fall 2
backend backend-certbot
server letsencrypt 127.0.0.1:9080
Once that is done run
systemctl reload haproxy
The above config will get you running with HTTP. You must make sure that the default_backend under http and https match the backend name in the non backend-certbot section or haproxy wont start. You can change the server checks yourself but the above will check each core server every 5 seconds for a response. It it fails twice it will not use that server in the balancer. If you want to be able to view your haproxy stats you can uncomment line 9 above and run
systemctl reload haproxy
You can then go to http://haproxyipaddress/fqdn/haproxy?stats or http://fqdn/haproxy?stats
SSL Setup
In order to setup SSL Using LetsEncrypt your FQDN must be pointing to the public IP address of your haproxy server. You also need to have certbot installed. Run the following, replacing mydomain.com with your FQDN and me@mydomain.com with your email address. You should get a message saying that your certificate and chain have been saved etc.
certbot certonly --standalone --preferred-challenges http --http-01-address 127.0.0.1 --http-01-port 9080 -d mydomain.com --email me@mydomain.com --agree-tos --non-interactive
We then need to combine those files into one for haproxy.
sudo nano /etc/haproxy/prepareLetsEncryptCertificates.sh
Then add the following:
#!/bin/bash
# Loop through all Let's Encrypt certificates
for CERTIFICATE in `find /etc/letsencrypt/live/* -type d`; do
CERTIFICATE=`basename $CERTIFICATE`
# Combine certificate and private key to single file
cat /etc/letsencrypt/live/$CERTIFICATE/fullchain.pem /etc/letsencrypt/live/$CERTIFICATE/privkey.pem > /etc/haproxy/ssl/$CERTIFICATE.pem
done
Create the SSL Directory
mkdir /etc/haproxy/ssl
Execute all the things!
chmod +x /etc/haproxy/prepareLetsEncryptCertificates.sh
sh /etc/haproxy/prepareLetsEncryptCertificates.sh
If the above has all gone well you should now be able to edit your haproxy config file and enable SSL by uncommenting the following lines in the config below (copied from above): Line 7 - if you want to force SSL Lines 16-19 Lines 21-23
frontend --name to define frontend http--
# Define Port to Bind To and set the mode
bind :80
bind :::80
mode http
# Used to redirect HTTP Requests to HTTPS
# http-request redirect scheme https unless { ssl_fc }
# Enable this if you want to view stats
# stats uri /haproxy?stats
# Sets the default backend for servers
default_backend --name to define below backend (MUST MATCH)--
# Certbot SSL Installation
acl is_certbot path_beg /.well-known/acme-challenge/
use_backend backend-certbot if is_certbot
#frontend --name to define frontend https--
# bind :443 ssl crt /etc/haproxy/ssl/
# bind :::443 ssl crt /etc/haproxy/ssl/
# mode http
# ACL for detecting Let's Encrypt validtion requests
# acl is_certbot path_beg /.well-known/acme-challenge/
# use_backend backend-certbot if is_certbot
# default_backend --name to define below backend (MUST MATCH)--
backend --name to define below backend (MUST MATCH ABOVE default_backed)--
mode http
balance leastconn
server --yourservername-- --server internal or public ip--:80 check inter 5s rise 3 fall 2
backend backend-certbot
server letsencrypt 127.0.0.1:9080
Automatic Certificate Renewals and File Merging
Create a script to automate the certbot renewal and then merge the files and reload haproxy.
sudo nano /etc/haproxy/renewLetsEncryptCertificates.sh
Then Add:
#!/bin/bash
certbot renew --standalone --preferred-challenges http --http-01-address 127.0.0.1 --http-01-port 9080 --post-hook "/etc/haproxy/prepareLetsEncryptCertificates.sh && systemctl reload haproxy.service" --quiet
And make it executable:
chmod +x /etc/haproxy/renewLetsEncryptCertificates.sh
Create a cronjob to get the script to check for certificate renewals and run the certificate merge:
crontab -e
0 0 * * * /bin/sh /etc/haproxy/renewLetsEncryptCertificates.sh
Job done!
Lock Down Stats Page
If you want the stats page to be active then haproxy have a good blog post on how to lock it down and also what all of the metrics mean below: https://www.haproxy.com/blog/exploring-the-haproxy-stats-page/